High Acid - Boiling Water Bath
Description
Boiling Water Bath preserving is the accepted world standard for 'high acid' preserving, please make sure any guide you use is up to date, and consistent with the instructions on this page.
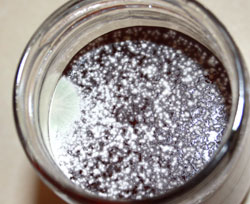
This Jam was not "boiling water bath" processed,
and was covered in mould when opened.
With so many great 'high acid' recipes, foods, pickles, chutneys, and jams to choose from it's easy to start.
You don't need any specialized equipment and the process is simple. You even recycle the jars. All you need is a recipe and for safety's sake, new lids.
If you are looking for some good recipes please try some of my favourite creations on Valerie's Blog, and you can browse through our online store where you'll find some great specialized "preserving and canning" guides & cookbooks.
Equipment
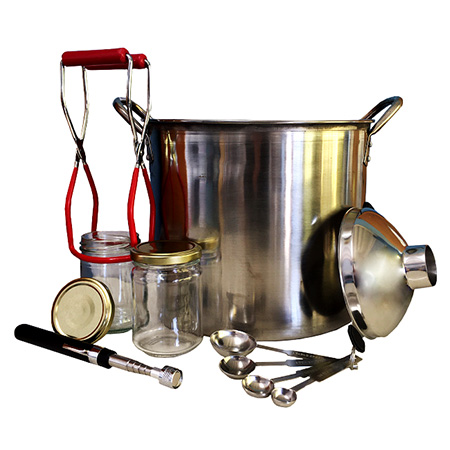
This is the basic equipment needed for "Boiling Water Bath" preserving, as you can see it is common kitchen equipment.
- Big Pot
- Scales
- Knife
- Jar Lifter
- Wooden Spoon
You will need a large pot to use as your boiling water bath. This pot will need to be big enough to stand 4 or more jars in and then fill with water till the jars are completely submerged.

As you will be standing glass jars in this pot, you need to create a space between the jars and the bottom of the pot. To do this you can use a round cake rack or the removable bottom of a springform cake tin. It does not need to be much of a space, but enough so that the glass jars are not sitting directly on the bottom of the pot.
You will need jars. These can be re-used from the jars you purchase food in from the grocery store. If you do not have any at home, ask a neighbour if she/he has any jars. They end up in the garbage most of the time, so people will be quite willing to give them to you.
You will need lids for the jars. It is not advisable to use lids that have been used before. If you look at the inside of the lid you will see a ring made up of a rubbery substance. This is what makes the seal. This substance is affected by the acids in the original jar contents, and in the recipe, you are processing and can become degraded with multiple uses. Therefore they are only to be used once to be sure you will get a good seal. Our new or replacement lids are what you need.
You will also need a pair of tongs, some clean towels and a wide mouth funnel. If you can't locate a funnel, you can get creative. I have used the top half of a plastic 2-litre milk container, or a plastic cup with the bottom cut out.
Procedure
Prepare a nice big batch of one of the preserves/sauces from the list of recipes provided or a recipe from another publication if you have one. Remember you are going to be eating this, so a little taste test along the way is recommended. No recipe is ever 100% accurate as acid and sugar levels in your ingredients will vary according to soil types and ripeness.
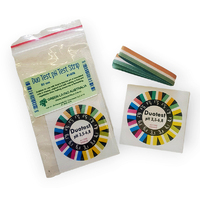
If you are not sure about the acidity of your recipe, test the PH of your preserves to make sure that it is below 4.6. High acid foods are ok to process in a boiling water bath but all other foods must be processed by pressure preserving.
Wash the jars you are going to use in hot, soapy water and then rinse well. Leave them in a sink of hot water to await being filled with your preserves. Do the same to the lids and leave them in a sink of hot water waiting to be placed on the jars once full.
If the processing time for your recipe is less than ten minutes it is recommended that the jars and lids should be sterilised in boiling water after washing.
Spread a towel out on your counter and when you are ready to fill your jars, place the jars on the towel, right by the pot of preserves. (This is where you need the jar lifter, so as not to burn your hands getting the jars out of the hot water.) You want the jars to be still hot when you are putting the hot preserves into them too. Hot liquid into cold glass can cause the glass to break so be sure that your jars are left in the hot water right up until you are ready to start filling the jars.
Fill each of the jars with the preserve, using a wide mouth funnel, or your own creation, leaving a two and a half cm space at the top. Once the jars are full, wipe off the rims with a clean cloth. Be sure that there is no preserve on the rims of the jars as anything that gets between the rim of the jar and the lid can stop you from getting a good seal.
Once you have cleaned off the rims of the jars you are ready to put on the lids. Using the tongs, get the lids out of the hot water and place them on the jars, tightening them all the way.
Now you are ready to process the jars to get the vacuum seal to ensure freshness.
Get the large pot and place the article you have chosen into the bottom to create a space between the bottom of the pot and the jars. As mentioned before, this can be a cake rack or something similar. Then place the jars into the pot ensuring they are not touching each other. Then using a jug, begin to fill the pot with warm to hot water. Do not use boiling water, but do not put cold water in as the glass is hot and once again you do not want to risk any jars breaking due to rapid temperature change. Fill the pot till the jars are completely submerged, and covered by at least 25mm.
Turn the stove on low to medium and slowly bring the pot of water, with your jars in it, to the boil.
This should be a gentle boil, or what John Gross in "Food Preserving At Home" describes as "briskly boiling" water.
Processing
Process the jars at this gentle boil for the time required in the recipe and depending on the jar size. Larger jars are processed for longer.
Once the time for processing has been reached, turn the stove off and leave the jars in the water to cool down. You want them to cool down slowly. There is no reason for you to risk trying to get the jars out of hot water and burning yourself. Once the water has cooled sufficiently for you to safely remove the jars you can do so. Place the jars in a safe place to continue cooling if necessary. If you are planning to process more jars you can remove the hot jars using a jar lifter, if you desire.
As the jars cool down, a vacuum is created by the contents of the jar cooling, and the steam inside the jar condensing.
Push the pop-top button down as they cool. They will not stay down if the jars have not cooled sufficiently. If this happens just wait a little longer and push them down again. Continue to do this until all your pop tops stay down. If the pop tops do not stay down that is an indication that you do not have a vacuum seal.
If any of the jars do not seal, you can process them again or simply decide that this is the jar you are going to use right away. There are several reasons why a jar may not seal. There may have been some preserve left on the rim of the jar, or there may be a defect, such as a chip in the rim of the jar. Also if you do not leave enough empty space at the top of the jar, you could prevent a vacuum being created.
Now your jars are cool and the vacuum seal has been created, you need to label the jars with their contents and the date. This is important as no matter how good your seal is, you do not want to leave a jar at the back of the cupboard for years with no date on it. Always eat the oldest jar first. Even preserved foods that you purchase in the grocery store are dated with the best use by date.
More Information
Further information can be found in good preserving books, like those sold on our site. You can also download, in PDF format, ideal for printing or saving on your computer, the …
"USDA Complete Guide to Home Preserving"